Do you have Skullcandy earbuds? Don't know how to use Skullcandy mic on PC
Okay, so here we go, again!
I know where you are… You just got a brand new PC, right?
Now, you have all these jobs that you do from home, pending interviews and video conferences.
But as always, your computer's microphone simply sounds horrible!
Yes, there are professional microphone options but they are simply too big and don't look cool at all on your desk.
So what do you do?
Well, you must find a solution that lets you listen and also talk via microphone.
But this device has to be small, look stylish, discreet.
Any thoughts?
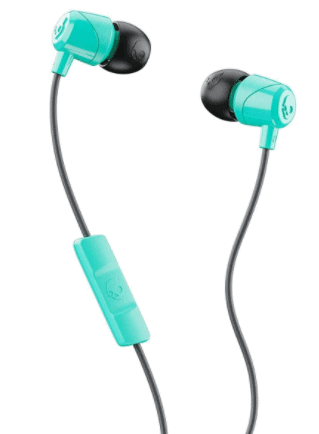
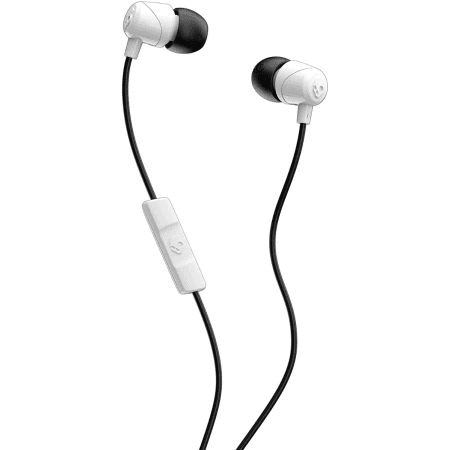
Yes! Skullcandy products! Skullcandy ear headphones!
They look amazing, sound great and their microphone captures your voice perfectly.
Also, their price is right, you can find them on Amazon, the warranty is great and they even have a dedicated volume button.
But, do you know how to use it?
Do you know how to use the Skullcandy Mic on PC?
Read this and thank me later.
How to use Skullcandy Mic on PC
Check the connections on the Skullcandy Earbuds and your PC
Are they compatible?
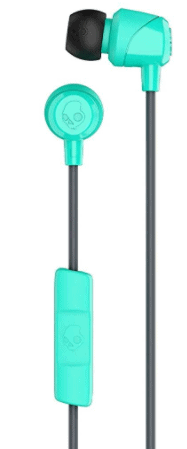
The Skullcandy Jib Wired Earbuds are 3.5mm connectors that have the stereo headphone signal as well as the mono mic signal all-in-one connector. No battery needed.
Does your laptop PC have the all-in-one headphone and microphone jack? Or are they separate?
Before you go ahead and buy these earbuds, go check this.
Otherwise, you won't be able to even connect them. BAD stuff!
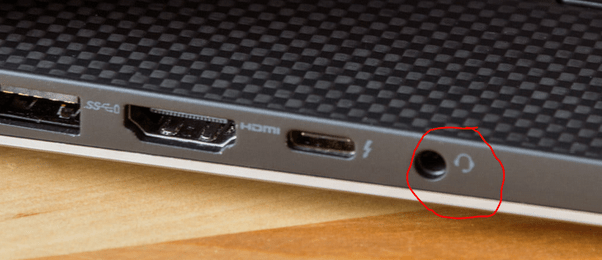
Size of stereo plug?
Well, Skullcandy features the standard 3.5mm size for the headphone plug mostly found on commercial and sport-oriented earbuds.
Make sure your computer has that.
Now, let's say your laptop actually has what they call the "mini plug". What are you gonna do?
Simple, just get an adaptor. Might be a bit tricky to find, but the internet (Amazon) has it all.
Just make sure the adaptor not only converts the stereo signal from the earbuds but also the mono signal from the microphone.
Connect it!
That's it!
Connect your earbuds to your laptop PC using the dedicated 3.5mm plug.
This should be easy since laptops only have one jack available.
Be gentle when you insert the tip, you don't want to break it!
Make sure it gets in all the way, you should hear it "click" at the end.
As soon as you connect it, your computer should show "headphones" as one of the possible listening sources.
It should also show "microphone" as one of the input sources.
If you see these two options, you are doing it right, your computer understands you just plugged it.
Also, this is a piece of hardware, totally plug-and-play and no battery needed.
No need to install any drivers.
No need to think about battery life or any issues regarding power.
Set the headphones level
Before you try to operate the earbuds, you have to make sure the level is NOT all the way up.
Why?
Easy. You don't want to blow your ears the second you start talking to someone else.
My recommendation set the level to the middle and go from there.
Do not go too low as you might not hear anything.
Do not go too high as the noise could be painful!
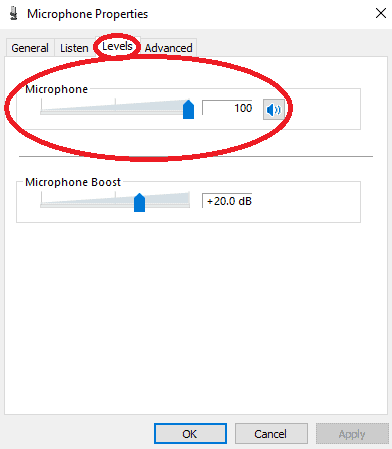
Set the microphone level
You should be able to open your sound preferences on Windows and test the microphone to see how loud (or soft) is the signal you capture.
There will be some kind of virtual slider that you can "pull" to the sides in order to boost or reduce the microphone gain.
Once again, you will control this by a lot of trial and error.
As a rule of thumb, make sure the signal does not distort nor clips, as this will create noise.
A nice and healthy microphone level will have peaks around 70 or 80% of the dynamic range.
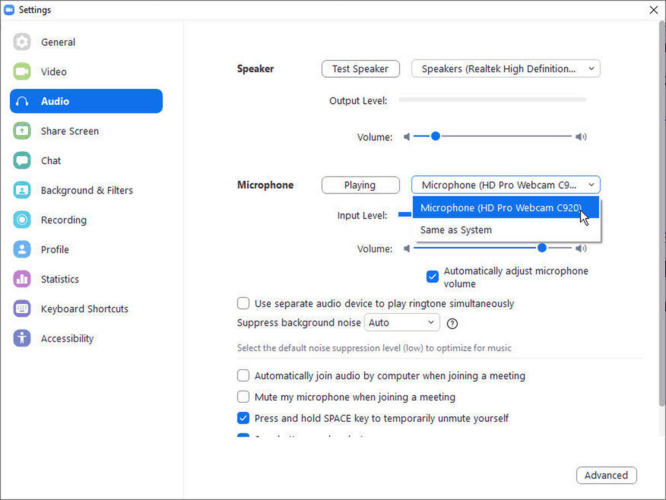
Open the application that you will use for video conferences or IP calls
Once you open the application, make sure you have the earbuds set as the listening device as well as the input device.
This is crucial so that people can listen to what you say, and you can listen to what they say.
You want to do this before you start any kind of video conference or call.
Applications like Zoom will let you test your microphone level (looking for noise) and sound quality prior.
Please take advantage of this feature in order to make sure everything sounds smooth, the last thing you want is people to complain about your audio signal quality.
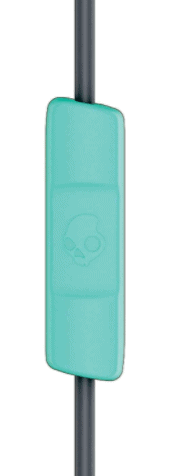
Set the Skullcandy microphone at a fixed distance from your mouth
You could perhaps use a clip to hold it on your shirt, that way the mic will be fixed and the distance from your mouth to the capsule will not change.
This will let you have a steady signal level, so when you start talking, it all remains the same, no need to modify the level or anything like that in order to reduce noise.
At the end of the day ,you want to make sure it all stays the same. Your listeners need consistency as far as sound quality.
Enjoy!
And that's it!
Now you can enjoy your Skullcandy products during your conferences, video calls, voice conversations ,and meetings.
Make sure you keep these configurations the same so you do not have problems in the future.
Read Also: How to Earrape Mic? (Discord, Zoom) – Don't Miss this Guide
Conclusion
If you bought the Skullcandy Microphone that comes with the Jib Wired Earbuds and headset you need to understand these systems are fragile.
This means that you must make sure you check all the steps mentioned above and take the proper measures to keep it in a safe place.
If you follow these guidelines, you will have a great experience with the Skullcandy Mic.
And at the end of the day, once the conversation starts and it all goes smooth, you are good!
Just enjoy the ride!