It can be frustrating when you find out your JLab earbuds not charging. This can happen for several reasons – from debris in the charging port to firmware problems. Read on as I'll offer 11 troubleshooting ways to help you regain the charging. So let's not waste any time and deep dive into this helpful guide!
Read Also: One Earbud Not Working: 10 Easy Fixes Listed!
JLab Earbuds Not Charging: 11 Ways to Solve the Issue
There are various reasons why your JLab earbuds may not be charging properly which are listed below:
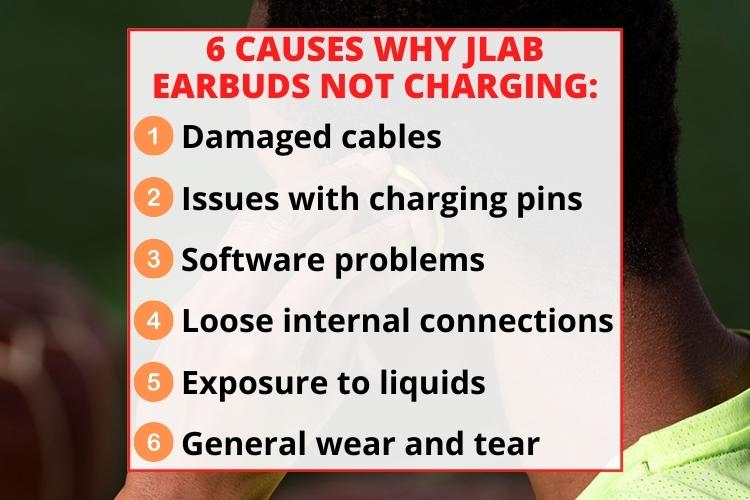
- Faulty or damaged cables;
- Issues with the charging pins;
- Software and firmware problems;
- Loose internal connections;
- Exposure to liquids or moisture;
- General wear and tear.
While the specific cause will determine the solution, below are some quick fixes as well as a 6-step reset guide to get your earbuds back on track. Let's dive in:
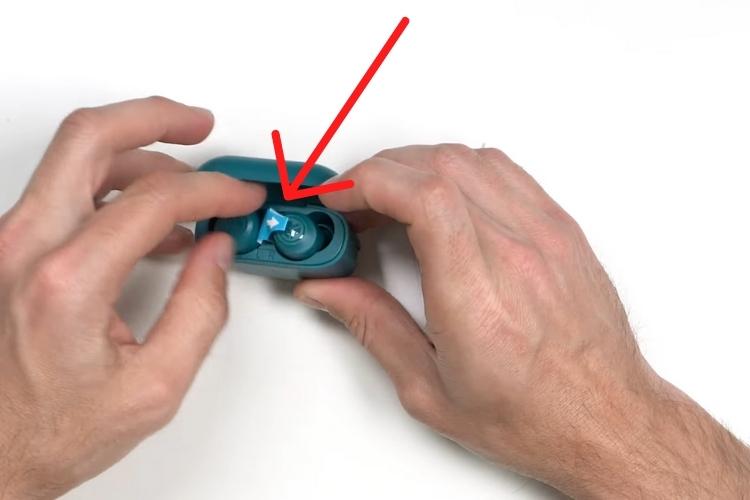
1. Peel Off the Protective Films From the Charging Pins
Did you just buy a new pair of JLab earbuds, and it was not charging? The culprit could be a thin plastic film or sticker covering the charging pins you forgot to remove. Manufacturers often put protective films over connectors and ports to prevent dust buildup.
Solution
To resolve this problem, check out the following troubleshooting points:
- Inspect the metal charging pins on both the earbuds and the charging case. Also, check the inside of the case for plastic peels as well, including around the metal contacts.
- Use your fingernail to peel up the edges of any plastic film gently and remove it.
2. Remove Dust From Your JLab Earbuds and Charging Case
Over time, dirt can build up on your JLab earbuds. This buildup happens gradually with regular use and can block charging as well as affect the sound quality. Moreover, a dirty charging case can also block the charging slot.

Solution
To clean your wireless earbuds and charging case:
- Use a dry cotton swab to wipe any visible debris around the metal charging pins gently.
- Check the case's charging port as well. Clean it with the help of a microfiber cloth or Q-tip.
- For deeper cleaning, dip the cotton swab in rubbing alcohol or use a portable vacuum to suck out any compacted dirt inside.
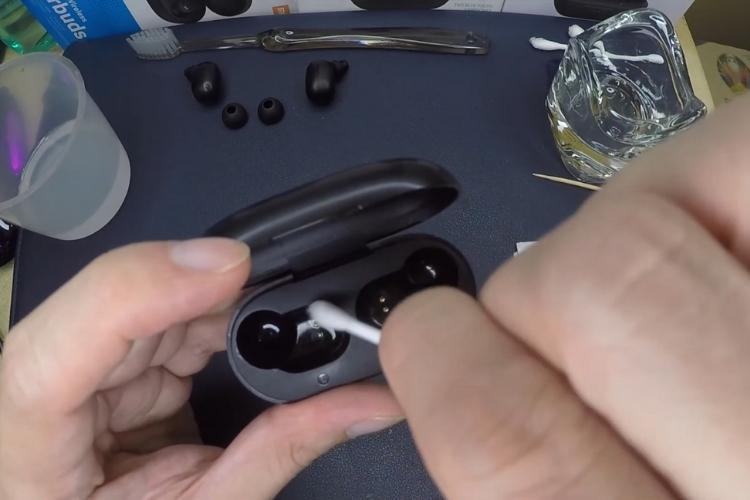
- If you spot rust on the metal connectors, use WD-40 lubricants to remove it.
3. Inspect Your Charging Cable for Any Damage
A faulty charging cable can also prevent your JLab earbuds from getting charged, especially if it is fraying, bent, or damaged. Fraying wires lead to interrupted connections.
Bends and kinks in the charging cable put stress on the internal wiring. Moreover, damage to the metal charging tip itself can prevent electrical contact.
Solution
To fix Jlab earbuds not charging cable issue, follow this:
- Inspect it for any damage, cuts, or exposure to internal wiring.
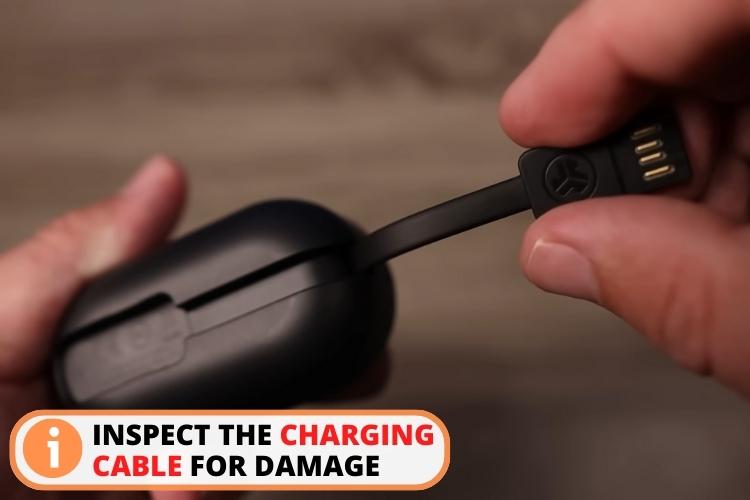
- Check that the metal charging tip is straight and undamaged. If you notice any dust stuck in it, you can fix it with the help of a port cleaner.
- When charging, wiggle the cable at different points to check for any loss of electrical connection.
- If nothing works, try charging with a different USB cable.
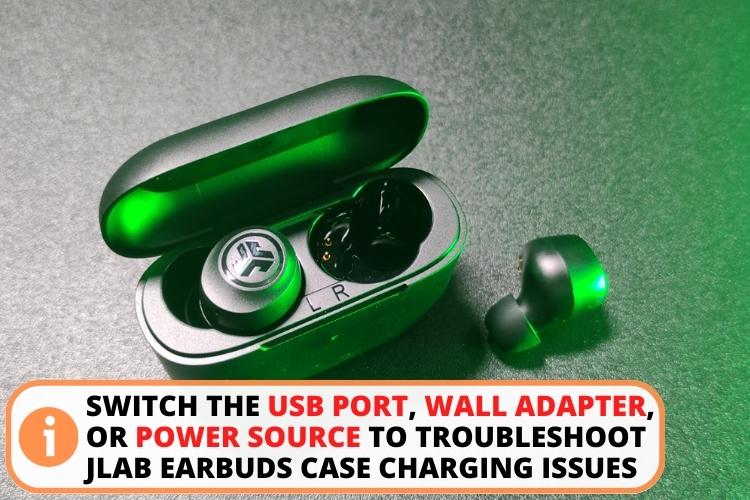
4. Try An Alternate Charging Method
Sometimes, the issue may lie with the USB port, wall adapter, or power source you use to charge JLab earbuds case. Switching to a different method can help determine if the problem is on the charging end.
Solution
Ensure that the cables are fully plugged into whatever source you use. Moreover, Avoid using low-power adapters, multi-port USB hubs, and extension cords.
5. Monitor Charging Case Temperature
Excessive heat in the case can sometimes cause charging issues with JLab earbuds. They have Lithium-ion batteries, which are prone to heating. Although companies have built-in charging safety features, they may sometimes be incompatible with external plugs or chargers.
Solution
For fixing JLab earbuds overheating problems, check this solution:
- Feel the charging case temperature after 30+ minutes of charging. It should not feel hot to the touch.
- Let the case cool down completely before charging again if it feels warm.
- Never charge an already hot case.
- Avoid leaving the case plugged in and charging for longer than necessary.
6. Overly Drained Batteries Issues
Allowing your JLab earbuds to drain until the battery dies can sometimes cause temporary charging issues. Li-ion batteries can enter "deep discharge" if drained too frequently. This can lead to permanent damage.
Solution
If your earbuds haven't been charging right after the battery fully depleted:
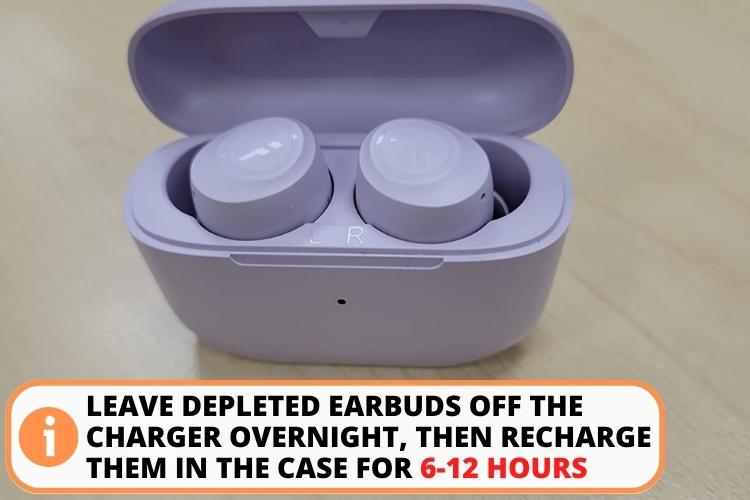
- Leave them off the charger overnight before attempting to Jlab earbuds charge again.
- Put the buds in the case and charge them overnight (6 -12 hours).
- Avoid doing full discharge/charge cycles too often. Keep batteries above 20%.
7. Inspect for Physical Damage
Drops, impacts, or other physical damage to your JLab earbuds or charging case could result in charging problems. Cracked cases or components can prevent proper electrical connections.
The hits or drops can also damage the charging port, metal pins, circuit boards, or battery without any visible exterior clues. Moreover, corrosion due to water damage can also block the batteries from charging.
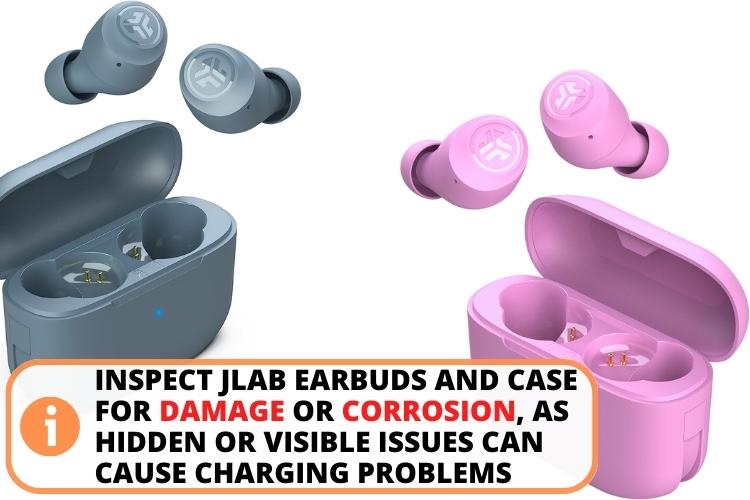
Solution
To check for physical damage:
- Closely inspect the case and earbuds for any visible cracks or dents.
- Check that the earbuds sit flush in the case without obstruction.
- Shake the case gently and listen for any rattling sounds.
- Look for signs of liquid damage like corrosion or oxidation around charging ports and pins.
- Press buttons and charging contacts to check they are solidly in place.
When you finally trace the damage, I would recommend you contact Jlab support and seek guidance.
8. Reset Your JLab Earbuds
If your JLab earbuds have charging issues after trying other troubleshooting, a simple device reset may be needed. In fact, if you don't find any hardware issues, you should perform a factory reset before going for any other step.
This will wipe all paired connections and settings but often resolves quirky software issues.
6-Step Guide to Reset the Earbuds
Follow these steps to reset JLab earbuds:
- Step 1. Open Bluetooth settings on your device, and forget or unpair the earbuds to disconnect them.
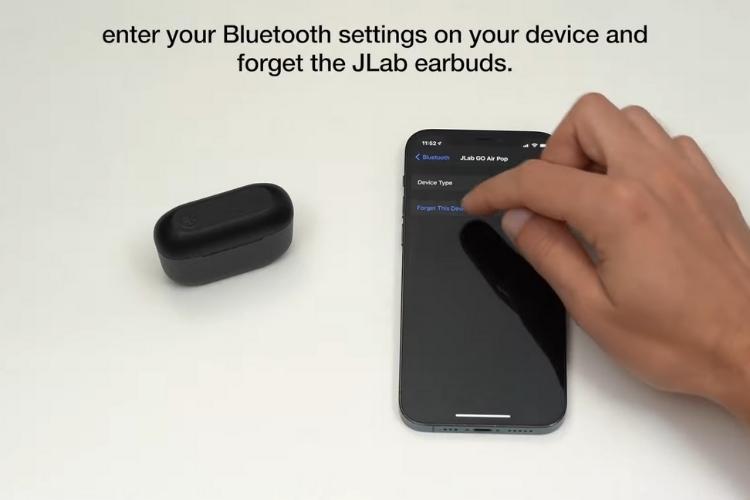
- Step 2. Place both earbuds inside the charging case.
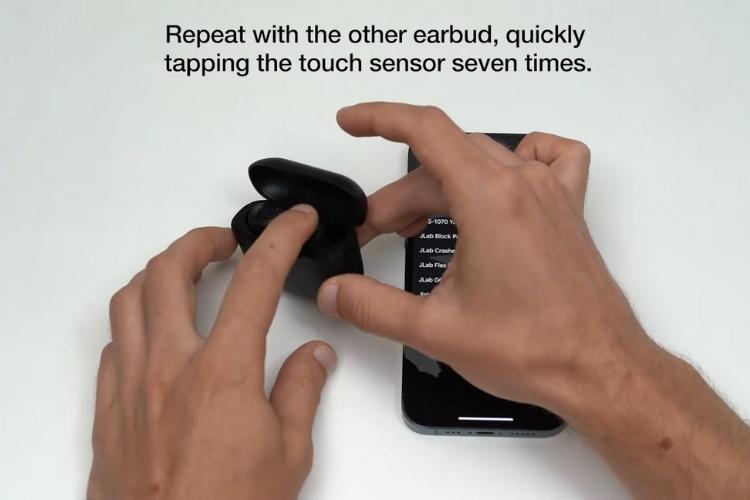
- Step 3. Quickly tap 7 times on the right JLab earbud (on the sensor) while it's in the case. It will blink blue 4 times to confirm the reset.

- Step 4. Do the same on the other earbud (left earbud), tapping 7 times. It should also blink blue 4 times.
- Step 5. Remove both earbuds from the charging case. One will show solid white, and the other earbud will blink blue/white. This means they are ready to pair again.
- Step 6. Open Bluetooth settings again to reconnect your earbuds and complete the pairing.
Follow this quick video to get help for resetting your JLab earbuds.
9. Update to the Latest Firmware
Outdated firmware on your JLab earbuds can sometimes lead to charging and battery issues. JLab periodically updates firmware containing bug fixes, performance improvements, and battery management changes.
Keeping your earbuds software up to date ensures you have all the latest tweaks.
Step-by-step Guide to Update Firmware
To update JLab earbuds firmware, follow these 6 steps:
- Step 1: First, pair your earbuds with your smartphone and ensure the phone has an active internet connection.
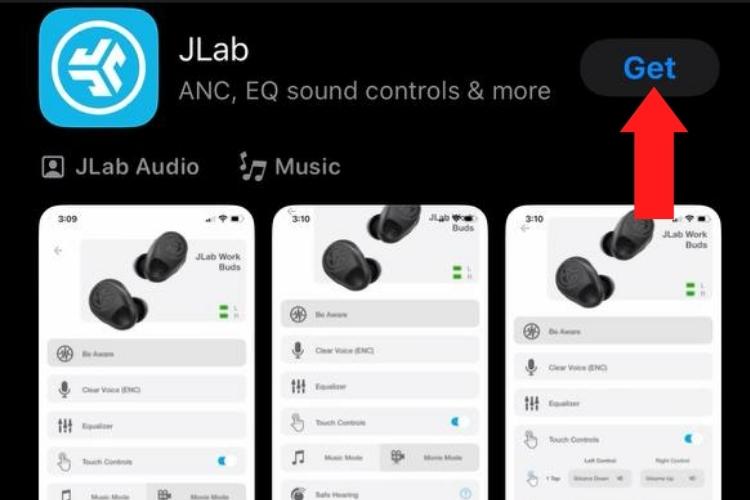
- Step 2: Open your device's app store (Google Play Store for Android and App Store for iPhones).
- Step 3: Install the JLab App. This app lets you view and install earbuds firmware updates.
- Step 4: Open the app and check if your earbuds have any pending firmware updates available to install.
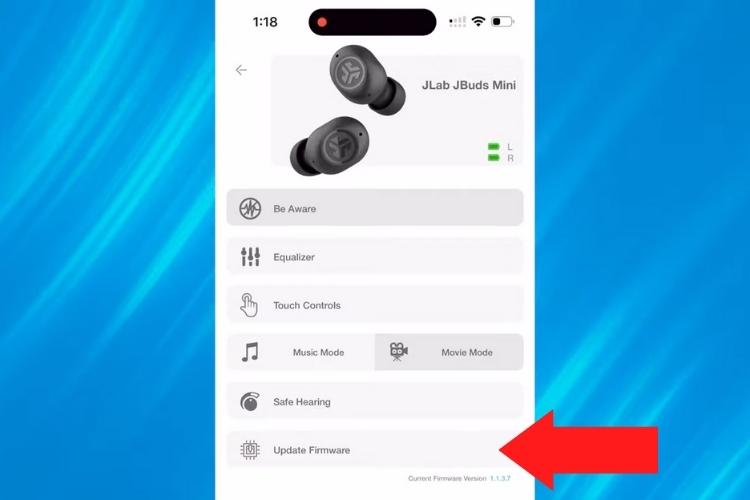
- Step 5: If an update is available, tap to download and install it. Allow the process to complete, which may take several minutes. Check if the charging issue is resolved once the update is completed.
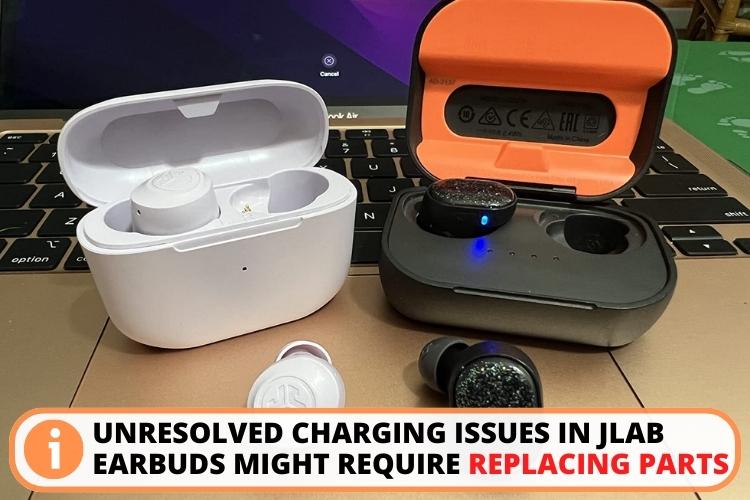
10. Change Faulty Hardware Components
If all troubleshooting fails to resolve the charging issues, the underlying problem may be a degraded or defective battery or other hardware component in your JLab earbuds.
Lithium-ion batteries slowly degrade, eventually losing maximum capacity and ability to hold a charge. Other internal components can also fail from age and wear. Replacing faulty parts is the only option left.
Solution
To change the hardware, follow these steps:
- Contact JLab support about potential replacement options if they are still under warranty.
- For under-warranty models, the company can change the parts for free.
- For out-of-warranty models, you can buy parts from the official site.
- Properly dispose of and recycle any non-functioning lithium-ion batteries.
11. Contact Customer Support
If you can't figure out the charging problem with your JLab earbuds on your own, it is suggested that you should contact their customer support. They have product experts who can diagnose more complex underlying issues preventing charging. Further, they can run advanced diagnostics and tests impossible for the average user.
You can contact JLab at the following resources:
- Call number (for international customers): 00-44-20-8142-9361
- Call number (for US customers): 1-405-445-7219
- Email address: support@jlab.com, customerlove@jlab.com
- Website (for US customers): JLab
- Website (for International customers): JLab
Read Also:
How to Reset Turtle Beach Stealth 600: 4 Quick Solutions
How to Turn on the Noise Cancelling on Beats Studio 3?
Sonos Roam Bluetooth Pairing in No Time: Troubleshooting Guide
Skullcandy Indy Evo Pairing: 5 Reasons They Are Not Pairing
Altec Lansing Bluetooth Speaker Pairing: 4-OS Based Guide
FAQ
To get your JLab earbuds to charge, try cleaning the charging contacts, switching USB cables/adapters, resetting the earbuds, or contacting JLab support.
To reset a JLab charging case, place earbuds inside and tap on the back 4 – 7 times until the blue light blinks 4 times. This resets the case.
If your earbuds won't charge, inspect for debris in the charging port, try different cables and chargers, or do a factory reset on the earbuds to troubleshoot.
When JLab earbuds are charging, you'll see a solid blue light that will turn off when fully charged. Some models, like JLab Go Air, show pulsing blue light while charging.
Conclusion
Summing up, JLab earbuds not charging is an issue that can leave you perplexed. If you spot debris or dust on connectors, clean them up with a soft brush. If you suspect your charging medium is not good, try an alternate cable or power brick.
Meanwhile, let the buds cool down if you suspect a heating issue. Likewise, resetting or updating the firmware can solve the technical glitches.
If nothing is working, contact customer support for charging port replacement or guidance for other issues. Nonetheless, taking care of your buds and cleaning them frequently can prevent these charging issues.