Is your Razer Blackshark V2 mic not working? Don't worry, I got you covered. The Razer Blackshark V2 gaming headset is famous for its comfort and sound, but users sometimes encounter mic issues.
I'll walk you through the correct hardware connections and software settings in this guide to fix the problem. With a few simple steps, you'll chat again in no time. Let's get started!
What's Causing Your Razer Blackshark V2 Mic Not Working?
Before we dive into the troubleshooting steps, it's essential to understand what might be causing your Razer Blackshark V2 microphone issues. The problem typically stems from a hardware defect or software misconfiguration preventing the mic from operating correctly.
- Faulty cables: Damaged or faulty cables are a common hardware issue that interrupts the connection and prevents mic input from transmitting.
- Audio settings not detecting headset: If the audio settings are not set to the Blackshark V2, the mic won't be enabled since it's not detected.
- Permission blocking: Privacy settings in Windows can block mic access for apps.
- Outdated drivers: Old audio drivers can have bugs or lose compatibility with the Blackshark V2 mic over time.
14 Steps to Get Your Razer Blackshark V2 Mic Working Again
By systematically looking at hardware factors and software settings, you can understand what's causing the Microphone issue. Follow along below as I go through each methodical troubleshooting step:
1. Confirm Your Headset is Connected Properly
The Razer Blackshark V2 relies on intact cables and a USB port to transmit microphone audio signals from the headset to your PC. Loose plugs into the USB sound card can cause a disconnection.
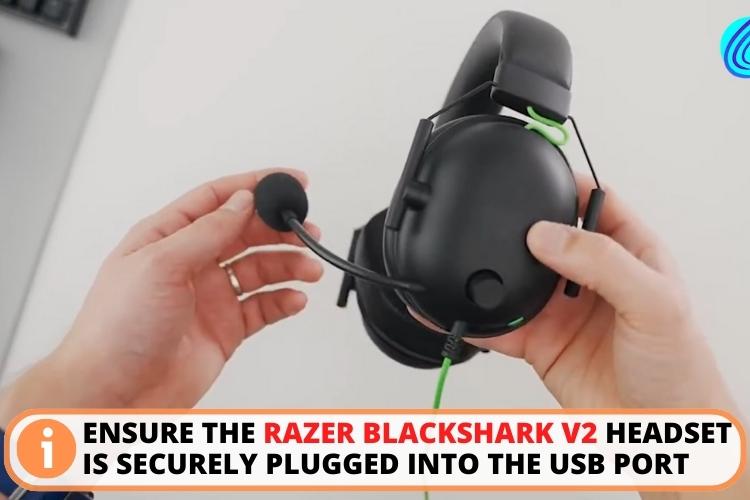
Ensure that the:
- The headset is fully seated in the USB port.
- Wiggle the connection to confirm that it is fully plugged in.
2. Swap Out Faulty Cables
Over time, bending and fraying can damage the headset cables. Worn-out cables with broken inner wires interrupt the mic audio signal transmitted from the Blackshark V2 to the PC.
Listed below are the helpful solutions:
- Try replacing the auxiliary cable with a new compatible aux cable.
- For USB headsets, swap out the USB cable with a fresh, undamaged one.
- Test the mic function after replacing the cable.
3. Try a Different USB Port and Clean the Headset Jack
Along with cables, the ports you plug the Blackshark V2 into could also be the culprit. This means that even though the wires are completely fine the USB port or headphone jack of the laptop can cause the issue.
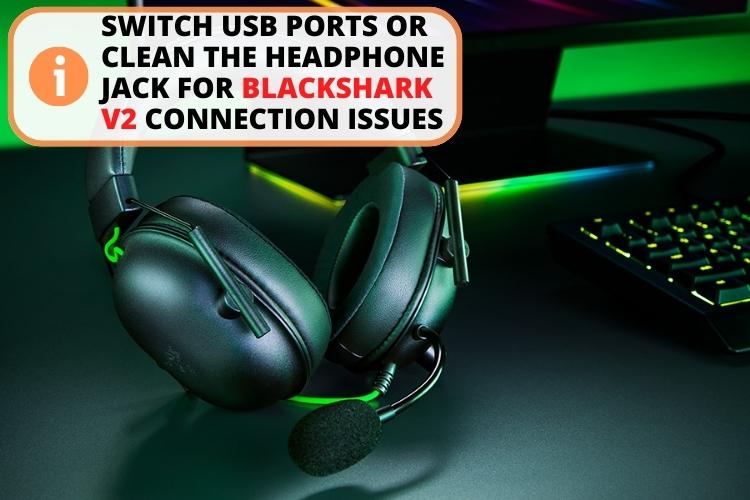
Here's what you should do when dealing with faulty ports:
- For USB connections: If using a USB connection, try plugging into a different USB port on your computer. Ports can sometimes malfunction, so switching to a separate one may help.
- For headphone jack: For the 3.5mm audio jack, the actual headphone port itself could be dirty or damaged. Inspect the headset port for any debris, dust, or damage. Clean out the port carefully using compressed air.
4. Test the Blackshark V2 Headset on Another Device
Many users have complained that Shark V2 was not working on their computer, but it was fine on another similar device. This issue usually arises due to compatibility problems, outdated drivers, or issues with the sound settings.
Let's discover what you should do:
- Try plugging your Razer v2 headset into another device to address these issues. Look for a laptop that has similar ports.
- If the mic works fine when connected to other devices, it points to a problem with settings or compatibility, specifically on your primary PC.
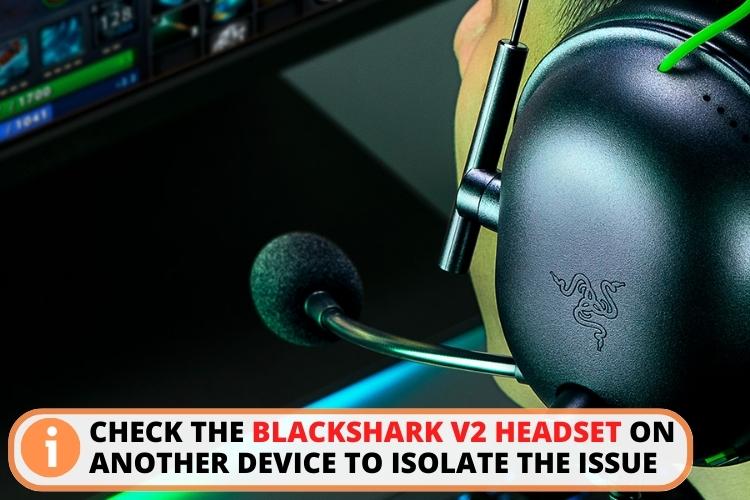
However, if it fails on different devices, it indicates a headset defect or problem.
5. Reboot Your Laptop
An easy first software troubleshooting step is to restart your Windows operating system. Complete shutdowns and fresh restarts can reset software configurations and audio driver issues, preventing the microphone properly function.
Here's how you can easily restart your system:
- Click the Start button and hit the power icon;
- Restart your PC and check if the Razer headset mic now works. Often, a fresh reboot will reinitialize components correctly.
6. Adjust the Volume and Unmute the Microphone
The physical mic mute button on the left earcup of the Razer Blackshark V2 disables microphone audio pickup. Accidental bumps or toggles of this onboard mute switch could have turned it on without you realizing it.
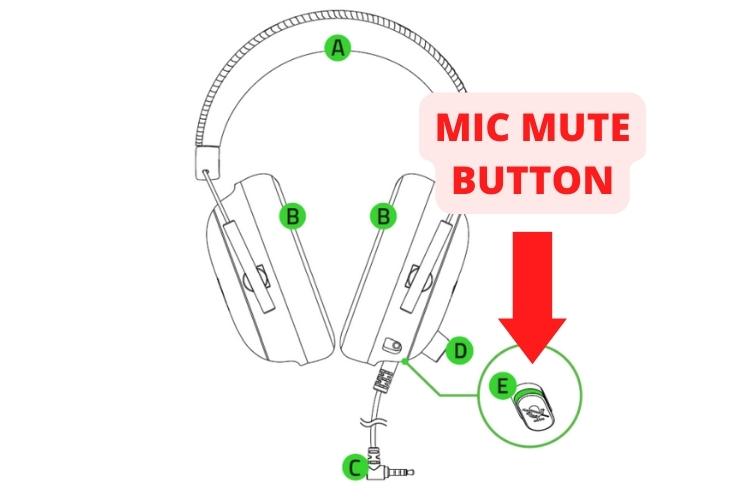
A red LED light on the mic button indicates mute is enabled. Here's how you can disable it:
- Press the mic mute button again, which will disable the mute setting. The red light will turn off when the mute is disengaged.
- Adjust the sound levels in the Control panel > Sound and Hardware > Sound icon > Playback & Recording tab. Ensure volume is at 50-100%, not zero or muted.
Here's a related video you should check out.
7. Provide Microphone Access in Settings
Windows includes privacy settings that can block microphone access for specific apps and programs. If mic access is disabled, it will cause issues like your Razer headset not working.
The following are the guidelines to resolve the permission issue:
- To check mic permissions, head to Windows Settings > Privacy & security;
- Under the "App permissions" tab, click Microphone;
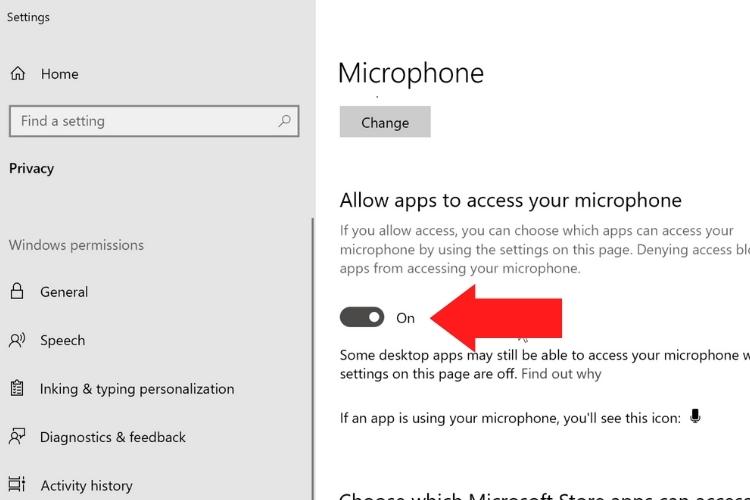
- Ensure the toggle at the top is switched to On to allow microphone access.
Additionally, check that the apps you want to use the mic are toggled to On. For example, ensure microphone access is allowed for your games, voice chat programs, and other apps.
8. Make the Razer Blackshark V2 the Default Audio Device
For your headset mic to work, the Blackshark v2 must be your default recording device in Windows. This means it will be the primary mic used for any application audio inputs.
Often, Windows doesn't select any device as default if you keep switching between internal and external microphones.
Here's how you can select the default mic:
- Go to Windows Settings > System > Sound;
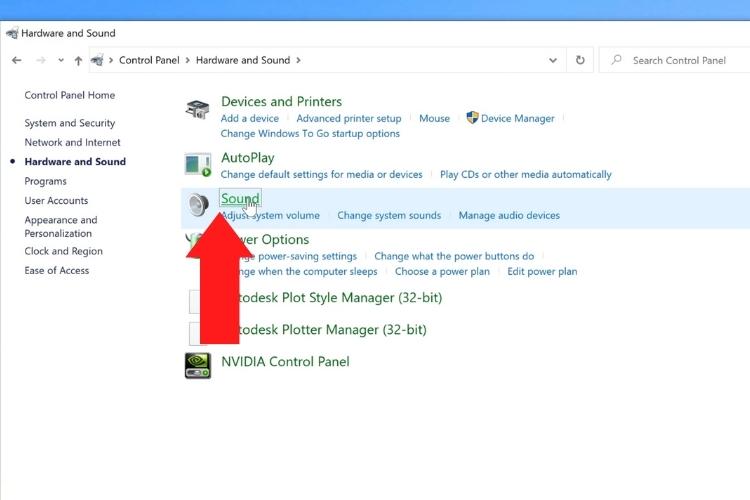
- Under the Input tab, check that your Razer headset is selected as the default microphone;
- If not, select it from the dropdown menu and Apply the change.
- Setting it as default will ensure Windows and your programs route microphone input through your headset.
9. Install Updated Audio Drivers
Outdated or missing drivers can cause mic issues like your Blackshark V2 not picking up audio. Moreover, Windows automatically installs drivers for first-time users – which might not have happened in your case.
Whatever the reason, updating to the latest sound drivers in the Device Manager from Razer ensures maximum compatibility and performance.
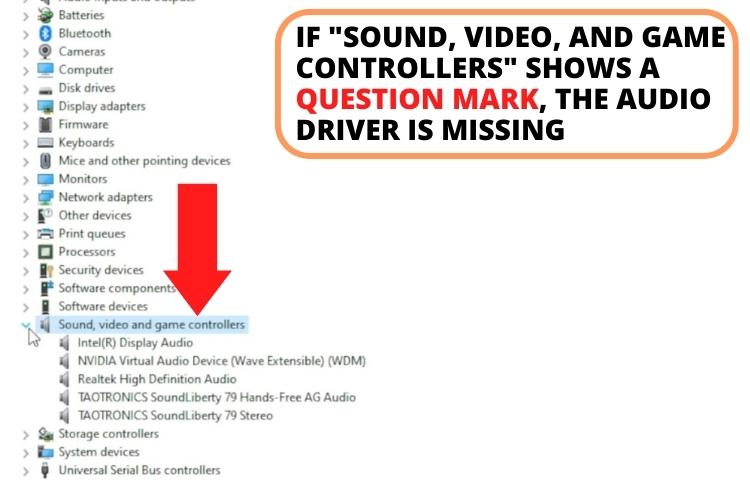
1. First, check whether the audio drivers are missing or not:
- Right-click on The PC > Manage;
- Choose Device Manager from the sidebar. This will show the list of all the physical hardware and their drivers.
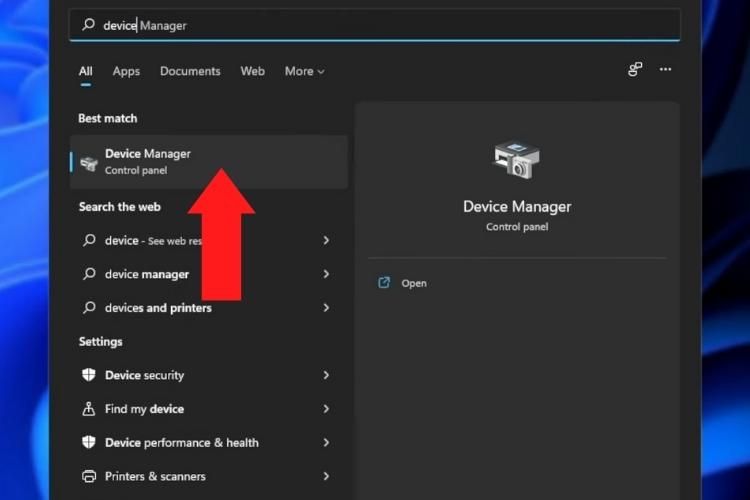
- Check "Sound, video, and game controllers" option has a question mark-like sign – which indicates that the audio driver is missing.
2. To automatically install the drivers:
- Download an online tool like Driver Easy.
- Run this software, and it will scan your PC for possible audio driver installation and will install them.
3. To manually install the drivers:
- First, find your current driver version under Sound settings;
- Then visit the Razer Support website and search for the latest audio drivers;
- Download and install the newer driver.
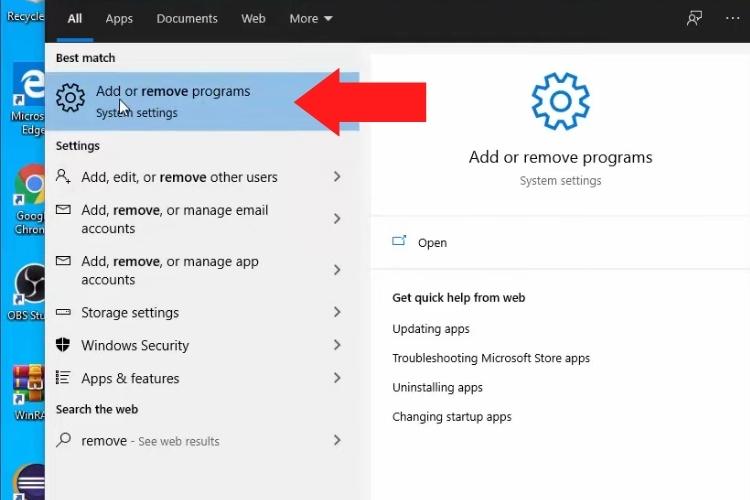
10. Reinstall the Razer Synapse Software
The Razer Synapse software helps manage configurations and settings for your Blackshark V2 headset. Reinstalling Synapse can help reset any problematic settings causing the mic not to work.

Search "Add or remove programs" in the Start menu. Then follow these instructions:
- Find the current version of Razer Synapse from the list of installed apps and uninstall it.
- Restart your PC after the process.
- Then, visit the Razer website to download the latest version of Synapse and reinstall it.
For more help, check out this video.
11. Update Your Operating System
Along with hardware drivers, staying updated with the latest Windows updates can help resolve microphone problems. Whenever you install an updated copy, Windows automatically installs drivers related to the microphone.
However, due to bugs or glitches, the installation of these drivers may miss out.
Listed below are the guidelines to easily update OS:
- To update Windows, head to Settings > Windows Update;
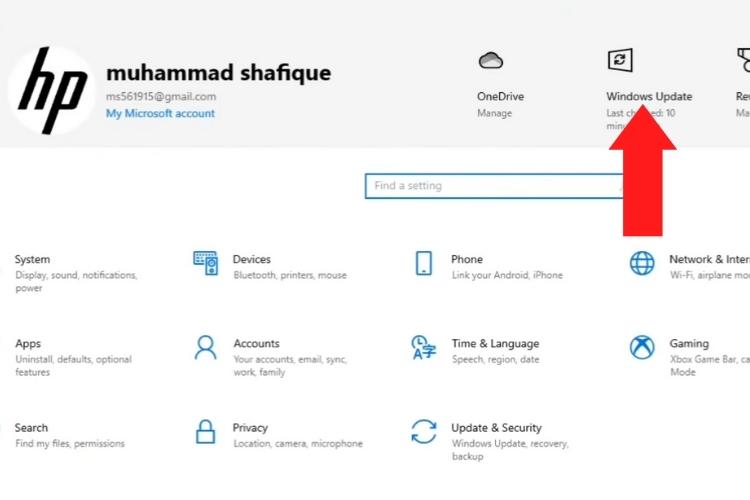
- Click Check for Updates and install any available patches or upgrades.
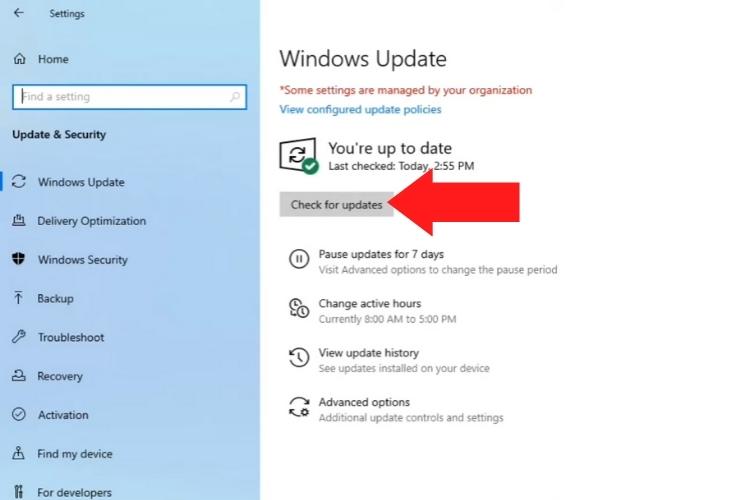
- In the Update Window, click Advanced options;
- Under the Additional Options, choose Optional updates and see if there are any driver updates;
- Install them and reboot your PC.
12. Run the Built-in Mic Troubleshooter
Windows includes an automated troubleshooter tool that can diagnose common mic problems and try to resolve them.
To easily identify and fix potential audio issues, follow these instructions:
- Go to Settings > System > Advanced;
- Run the troubleshooting by choosing the Input devices from the first option;
- Also, go to Settings > System > Troubleshoot;
- Click the Run in front of the first option, "Audio."
13. Remove Spatial Audio Apps like the 7.1 Surround Sound App
The Razer Blackshark V2 includes THX Spatial Audio support for 7.1 surround sound. This is a technology that enhances the sound quality. However, some users have reported this spatial audio app causing interference with the mic.
Here's how to remove the trouble-causing app:
- Open the Control panel, go to Add or Remove program;
- Find the 7.1 surround sound app and uninstall it;
- Then restart your PC.
14. Get a Replacement or Repair for Defective Hardware
The headset may be defective if you still have mic issues after trying the above software and hardware troubleshooting.
Contact Razer Support to report a defective product.
- Get the knowledge related to your product on the Product Support page.
- To get the information related to your warranty, go to the Warranty Policy page.
- To resolve issues related to your microphone or for repairs, contact their technical team.
To learn more about fixing Razor V2, check out this interesting video.
FAQs
Your Razer Blackshark V2 microphone is not working due to hardware issues like faulty cables. Also, the problem can be in connections or software settings like incorrect audio input selected in Windows.
Your Razer mic is not picking up because of compatibility issues with the PC. Either the audio drivers are outdated, or the privacy settings block the microphone.
To unmute your Razer Blackshark V2, locate the mic mute button on the left earcup. When muted, the controller will glow red. Press the button again to disable mute. The red light will turn off when the mic is unmuted.
Conclusion
The final say is that the Razer Blackshark V2 mic not working will spoil your online gaming experience. But, you can fix it with easy troubleshooting steps.
Check the volume or mute button if the mic is showing on the PC but not picking up the sounds. However, if the microphone is not showing on the PC, look for hardware issues like cabling or connections.
If the mic is connected but not working, you need to look out for the permission settings as well as software settings in Windows and Razer Synapse. Lastly, if your issue is still not resolved, it is recommended to reach out to Razer support.
Read also:
Turtle Beach Stealth 600 vs 700: Which is the Best Gaming Headset